Translation notice
This page was translated with machine translation and may contain inaccuracies. If you can help improve it, please open an issue or submit a pull request.
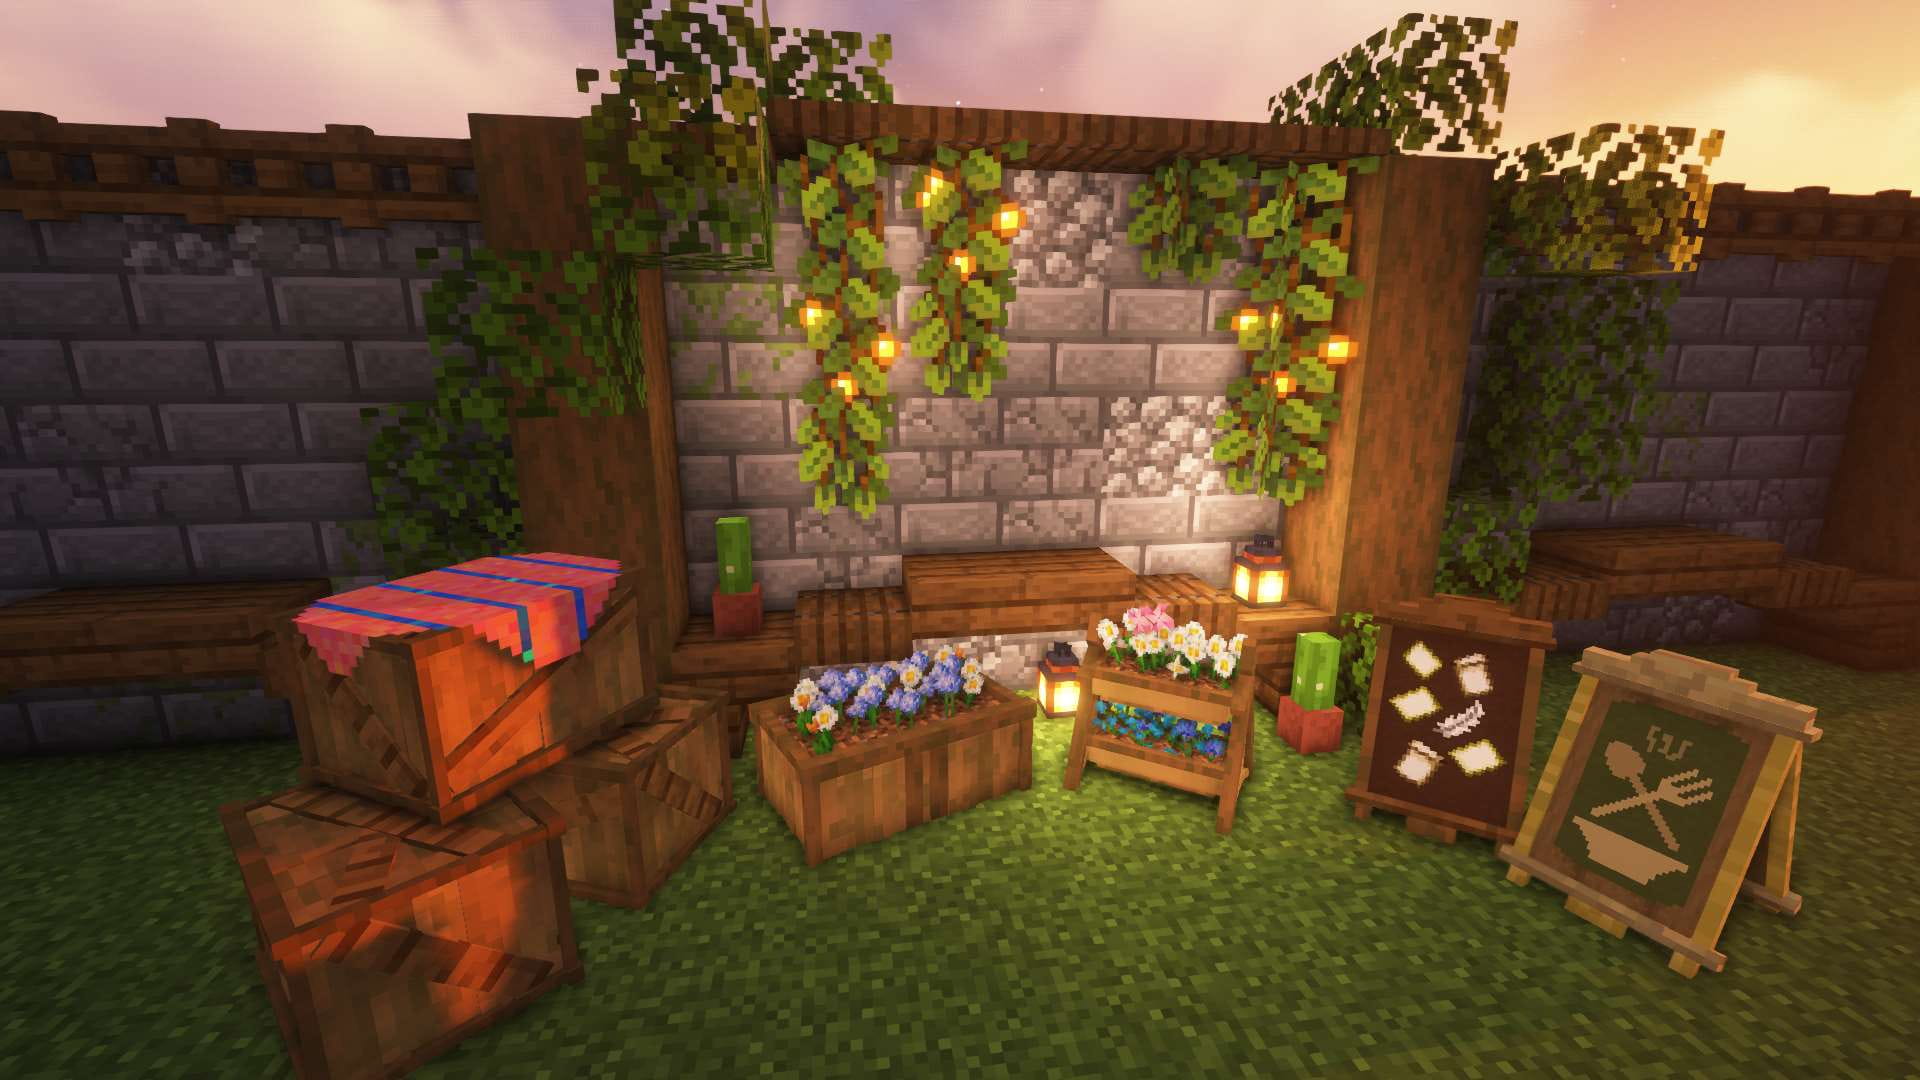


Make interactive models like writing poetry
This project is called SK Model Workspace and aims to create interactive and reusable models in a simple way. It also has rich interfaces and strong scalability Because the author has been mumbling, there are many holes in this project that have not been filled, if you are using Vanilla Library To browse this page, you can Click here Visit the original page of the article. The article will continue to be updated on the original page and more useful features will be added later. Later I will also make some vanilla furniture based on this data pack, ~~ (However, I don’t know how to model, so I’m not very good at it) ~~
- How it works: vanilla game,data pack
- Supported version: 1.21.8
This article will introduce the functions of this data pack in detail and provide some case tutorials to facilitate readers' understanding. If you have any questions or suggestions, you can contact me directly on station b or QQ.
data pack download
Dependencies
- (data pack) SK Model Workspace
- (front data pack) SK API
Overview
What is an "interactive model"?
The player performs certain operations on the model, and the model responds to the operation. A model with this characteristic can be called an "interactive model." For example, if there is a chair, the player can destroy it by left-clicking, and sit on it by right-clicking. Among them, "left click" and "right click" are operations, and "destroy" and "sit" are feedback. At this time, the chair is an "interactive model"
Display entities and interactive entities were added in version 1.19.4, which provides many conveniences to vanilla developers and also brings the possibility of finding simple implementation methods of "interactive models". There are currently many excellent works in this field:
- Deco Creater kit - Simple interactive decoration model support library
- NatureCraft - high version custom model framework
- NyaaWorks - Furniture System
- Generate a button that can customize interactive feedback with one click
How to achieve it
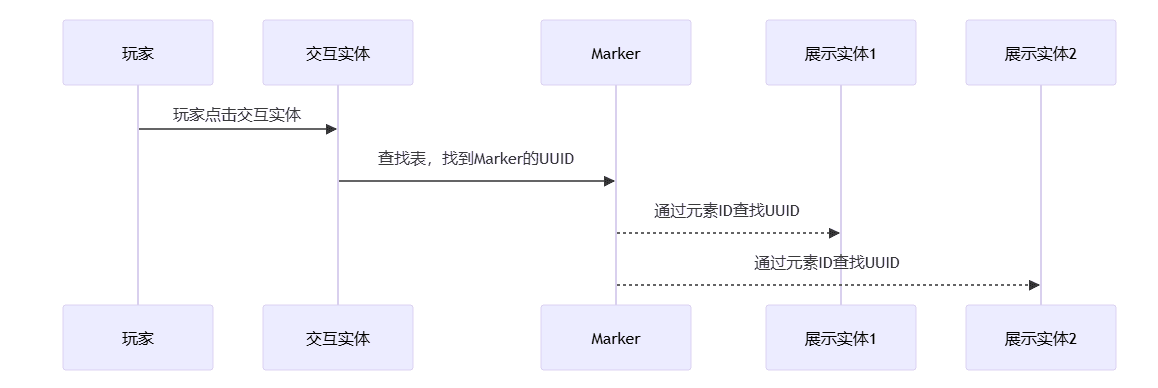
In SK Model Workspace, each interactive model consists of a Marker, one or more display entities and interactive entities. The interactive entities are used to receive the player's operations, and then the Marker will act as the executor to execute pre-set events, and finally the display entity will give certain feedback.
After the interactive entity receives the player's operation, it needs to tell the Marker to serve as the executor, but how to let the interactive entity find the Marker? One way is to make the interactive entity act as the passenger of the Marker. The interactive entity can use execute on vehicle to find the Marker, but there is obviously a problem with this: if there is more than one display entity and let them all serve as passengers of the Marker, then these display entities cannot set their own coordinates respectively. Obviously this is inappropriate
Another method is to store the UUID of the display entity and Marker in the storage when the model is created. The display entity only needs to look up the table to find the Marker.
Now that Marker has become the executor, it can operate all interactive entities. How to implement this? In fact, it is not difficult. We call all display entities and interactive entities in a model elements of the model, set a unique element ID for each element, and then store the element IDs and UUIDs of all elements in the Marker. The Marker can find the UUID of the element by giving the element ID to perform operations on the element.
In addition, SK Model Workspace also supports configuring blocks for the model. The model itself has no collision volume. Barrier blocks can be configured to add collision volumes to the model. You can also configure a light source block to make the model shine. At the same time, in order not to affect the existing blocks in the world, when the model is created, it will check whether the block at the target position is air. If so, the configured block will be placed.
Model class
Model class format
In SK Model Workspace, models are defined in the form of classes
data modify storage skmws reg.class.<类名> set value <模型数据>Parameter description <Model ID> The ID of the model, this is unique <Model data> A composite tag containing all the data of the model, the format is as follows
 (root tag)
abstract: (optional) indicates whether the model class is an abstract class
extends: (optional) a class name, the parent class of the model class
elements: Element list- (an element), For details, see: Element Format
marker_merge: (Optional) Merge data into the model's marker entity, For details, see: Wiki:Markerblocks: (optional) block list- (a block)
position: relative position of blockblock: blockID
events: (optional) A list of private events for this modelon_load: (Optional) Event executed when the model completes loading. For details, see: Event List Formaton_remove: (Optional) Event executed when the model is removed, For details, see: Event List Format- (Event List ID) (Optional) A custom event list, For details, see: Event List Format
anim: (optional) Private animation for this model- (animation ID) (optional) A custom animation, For details, see: Animation Format
properties: (Optional) Dynamic configuration of the model
permission: (optional) The operation permission of the model, see: Permission Control for detailsplaysound_on_place: (optional) The sound played when this model is instantiated (a custom project)
align_position: (Optional) Align coordinate. If there is no such item, coordinate alignment will not be performed. There are three numbers in the list, corresponding to the XYZ axis. The actual coordinate is the largest number that is not greater than the current coordinate and can be evenly divided by this value. Filling in -1 means that the coordinate of the axis is not aligned. Example: [1,-1,1] means that the XZ axis is aligned with the block grid, and the Y axis is not aligned.
align_rotation: (Optional) Constrains the yaw angle. If there is no such item, no yaw angle constraint will be performed. Example: input 90 means that the actual yaw angle is constrained to one of the four directions, southeast, northwest, and 45 means that the actual yaw angle is constrained to the eight basic directions.lock_rotation: (Optional) Lock the rotation angle so that the rotation angle is always the specified value. If this item and align_rotation exist at the same time, this item will be used first.
element format
We collectively refer to the display entities and interactive entities in a model as elements of this model. Each element has a unique element ID in this model class.
(an element)id: Element ID, the ID of all elements in the element list cannot be repeatedtype: entity type, optional values are item_display, text_display, block_display, interaction
When type:"interaction"criteria:leftclick: (Optional) Event executed when left clicked. For details, see: Conditional List Formatrightclick: (Optional) Event executed when right-clicking. For details, see: Conditional List Format
merge: (Optional) Merge data into this element. For details, see: Wiki:Interactive entityposition: (optional) The local coordinate of the element
when type:"item_display" or type:"text_display" or type:"block_display"merge: (Optional) Merge data, For details, see: Wiki: Display entityposition: (optional) the local coordinate of the elementrotation: (optional) relative rotation angle of the element
Dynamic configuration of model classes
The dynamic configuration data of the model is stored in
In properties, what is dynamic configuration? During the use of the model, there may be a need to access some variables. These variables are dynamic configurations. Dynamic configurations can be changed and take effect immediately after the model is instantiated, such as operation permissions.
permission can also be changed after the model is instantiated. Some built-in functions of this data pack also rely on dynamic configuration.
Model class inheritance
Model Class is similar to Class in Java. It also supports multi-layer inheritance. Inheritance can improve the reusability and scalability of code.
Here is an example: We want to make a "door". There are many types of doors: "oak door", "birch door", "acacia door"... You may think of creating separate model classes for each type of door, but doing so will produce a lot of redundant code, because any door supports operations such as "opening" and "closing," and this operation is written once in the model class of each type of door. Although there is no problem in doing so, it just requires writing a little more code. I can just copy and paste it (laughing). However, if one day you want to upgrade the relevant code for operations such as "opening" and "closing," you need to modify the relevant code in each class, which is really troublesome.
So you are smart and think that you can first create a "door" class, write the "opening" and "closing" related codes in the "door" class, and then let the "oak door" class, "birch door" class, "acacia wood door" class... all inherit from the "door" class, so that every class inherited from the "door" class has "opening" and "closing" operations. The next thing to do is to define the unique content of the subclass such as texture, model, sound effects, etc. in each subclass.
SK Model Workspace handles class inheritance in the following way, and temporarily stores the processed data for easy retrieval next time.
- Check the current model class
extends field, if it exists, the following processing will be performed on the model class inheritance. If the parent class also inherits from a certain class, the parent class will be processed recursively.
- Merge subclass and parent class
All data except elements
- exist
elements, in subclasses and in parent classes
Elements with the same ID are merged, and the data of the remaining elements whose IDs only exist in the parent class or child class are all retained.
In addition, the data in the parent class may be incomplete and must be supplemented by the subclass before it can be instantiated. In order to avoid unknown errors caused by incorrect instantiation of the parent class, you can add
abstract: 1b field declares the class as an abstract class, and abstract classes cannot be instantiated.
Instantiate model class
What is "instantiation"? Instantiation is indeed a very abstract concept, but here you can simply understand it as laying out the created model class. You can imagine that you hold a block and right-click on the ground, and the block is placed on the ground. This can be considered a kind of instantiation.
SK Model Workspace provides multiple ways to instantiate model classes
- by class name
function skmws:construct {class:"<类名>"}(execute) as will act as the owner of the model (execute) positioned The creation position of the model (execute) rotated Rotation angle when the model is created
- By passing in complete model class data
function skmws:construct_with(execute) as will act as the owner of the model (execute) positioned The creation position of the model (execute) rotated Rotation angle when the model is created storage skmws
temp.input enters a complete model class data
- Through Marker (for internal use, not recommended to call directly) Generate a Marker with the following data. The Marker's position and rotation angle will be applied to model creation.
Tags:["skmws.construct"]:data:input: A class name, or a complete model class data
Then execute this command This command will process the Marker with skmws.construct tag closest to the executor.
function skmws:_private/_player_detect(execute) as will act as the owner of the model
condition list
Overview
The list of conditions is located in the interaction element in the model class.
In criteriatag, in this tag
leftclick and
rightclick is a list of conditions. For example, when the player left-clicks on this interactive entity, it will be executed.
List of conditions in leftclick tag
To explain clearly what the condition list is used for, here is an example: Suppose there is a sheep. You can hold wheat to feed the sheep, or hold dye to dye the sheep, and hold scissors to shear the sheep. Behavior like this that performs different operations in different situations can be achieved through conditional lists
In SK Model Workspace, the condition list will be processed as follows
- Check each item in the condition list in turn
- Until a project is found and all condition checks in the project pass, the event list in the project will be executed and subsequent projects will no longer be checked.
conditional list format
(Conditional list root tag)- (a check item)
mainhand_item: (Optional) Check the interactive player's main hand item. For details, see: Wiki:itempredicateoffhand_item: (Optional) Check the interactive player offhand item, For details, see: Wiki:itempredicatepredicate: (Optional) Check the entitypredicate of the interactive player. For details, see: Wiki:entitypredicateevent: A list of events to be executed when all the above checks pass. For details, please see: Event List Format
event list
Overview
The operations performed after the model is interacted are implemented by event lists. When an event list is executed, all events in the list will be executed in sequence. The event list can be defined in the following places
- conditional list
event tag
- In the events.<event list ID> tag of the model class, the event list defined at this time is a private event list and can only be accessed by this class and its subclasses.
- Stored in the storage skmws reg.events.<event list ID> tag, the event list defined at this time is a global event list and can be accessed by all model classes. Some built-in functions of this package are implemented using the global event list. For details, see: Module
Event list format
The executor of the event list is the Marker of the model You can use @a[tag=skmws.s] to specify the player that is performing interactive operations
(an event list)- (an event)
type: Event type- Extra parameters for this event (see below)
destroy
When type:"remove" , remove the model and trigger the on_remove private event list
When type:"destroy" is used, the model is destroyed and the on_remove private event list is triggered. The effect of destroying the model is defined in the dynamic configuration of the model class, with the following format:
(Model class root tag) For details, see: Model class formatproperties:destroy: stores the effect when the model is destroyedsound: Play a sound when the model is destroyedparticle: Destroy particles, For details, see: Wiki:block particle optionsitem: (Optional) The dropped items when destroyed. If the item does not exist, no dropped items will be generated. If the item exists, the dropped items will be generated, and the content of the item will be merged into item. For details, see: Wiki:item format
cool down
When type:"cooldown", set the interactive cooling time, during which the model does not accept any operations
time: Cooling time
sit
When type:"sit", let the player performing the interactive operation sit on the model
id: Element ID, specifies which element the player should sit on
Call event list
When type:"call", call another event list
with:event: Event list IDglobal: (optional) indicates whether the called event list is a public event list
#animation
When type:"anim", play animation
with:anim: Animation IDglobal: (optional) specifies whether the calling animation is a public animationloop: (optional) specifies whether the animation will be played in a looptime: (optional) When looping the animation, the time it takes for the animation to play once
When type:"stopanim", stop the playing loop animation
Execute command
When type:"cmd", execute the specified command
with:cmd: command to be executedkey: (Optional) An NBT path, taking the value from the dynamic configuration of the model as a parameter of the command to be executed
When type:"execute", let the specified element execute the specified command
id: Element ID, as the executorwith:cmd: command to be executedkey: (Optional) An NBT path, taking the value from the dynamic configuration of the model as a parameter of the command to be executed
Modify element data
When type:"merge", merge data to the specified element
id: Element IDdata: Merge data
When type:"modify", modify the specified data of the specified element
id: Element IDkey: An NBT pathvalue: value
Add and delete elements
Add element when type:"element_append"
id: Element IDdata: (one element)
When type:"element_remove", remove the element
id: Element ID
block addition and deletion
When type:"block_append", add block
position: placement positionblock: blockID
When type:"block_remove", remove block
position: The position of the block to be removed
#Move model
When type:"move", move the entire model, including all blocks and elements Need to specify
position, or specify both
facing and
px
with:position: (optional) A three-element list representing relative displacementfacing: (optional) Orientation, optional values are "N", "E", "S", "W"px: (optional) The number of pixels to move in this direction
Modify model dynamic configuration
When type:"properties", edit the dynamic configuration of the model
key: An NBT pathvalue: value
Play sound
When type:"playsound", play sound
key: An NBT path, taking the value from the dynamic configuration of the model as the sound to be played
function form of event
In addition, these events have their corresponding functions. The effect of calling these functions is the same as executing events in the event list. These functions can be used in the command executed by the type:"cmd" event, but cannot be used in other contexts. The format is as follows:
function skmws:event/<事件类型> {<除type以外的参数>}animation
Overview
The transformation field of the display entity can be interpolated. We can use this feature to create simple animations.
Animation can be defined in the following places
- In the anim.<animation ID> tag of the model class, the animation defined at this time is a private animation and can only be accessed by this class and its subclasses.
- Stored in storage skmws reg.anim.<animation ID> tag, the animation defined at this time is a global animation and can be accessed by all model classes
animation format
(root tag)- (a project)
merge: The data to merge into the element- (Element ID) The data to be merged into this element
delay: The time since the previous project. If this project is the first project, this item can be omitted.
For detailed tutorials on this section, see Tutorial: Animation
Permission control
Overview
Each instantiated model has its own operation permissions. The permission information is defined in the dynamic configuration of the model class.
permissionmedium
Optional values and explanations are as follows:
|
| value of permission | permission description |
|---|---|
| 0 | Accessible to everyone |
| 1 | Only the model owner and his friends can access |
| 2 | Only the model owner can access |
| 3 | Not accessible to everyone |
- The owner is the creator of the model. Whoever instantiates the model is the owner of the model.
- Players with the skmws.debug tag can directly operate the model regardless of permissions.
Buddy system
This is a branch of the permission control system. The friend data of each player is stored in storage skmws friends. Currently, it can only be operated through command.
friends:- (a project)
UUID: UUID string of playerfriends: All friends of this player- (a project)
UUID: UUID string of player
- ...
- ...
module
Overview
This package encapsulates some commonly used functions into global event lists. We call these global event lists modules. Modules can be called in any model class, simplifying repeated operations. When using these modules, you need to add some fields to the dynamic configuration of the model class. See below for details.
Global event: model state switching
Sometimes the created model will have many states. For example, the door can be divided into two states: "open" and "closed", and the cake can be divided into 8 different states according to the degree of consumption. In order to simplify the processing of the model state, you can call the toggle_state global event list to switch the model to the next state, and then automatically call the model's private event list on_state_<current state> to complete more detailed processing of the model.
Global event list ID: toggle_state
(Model class root tag) For details, see: Model class formatproperties:toggle_state: stores model state switching related configurationscurrent_state: (optional) current state, default is 0number_of_state: (optional) The number of states, default is 2
For detailed tutorials on this section, please see Practical Combat: Silker Doors
Global events: push model
When this module is called, the model can move one frame in the direction the player is facing. If there is a block blocking the target position of the model, it will not move.
Global event list ID: push
(Model class root tag) For details, see: Model class formatproperties:pushable: Storage push related configurationplaysound: (optional) The sound played when the model is pushed
For a detailed tutorial on this section, see Tutorial: Pushing the Model
Global events: dyeing and cleaning
It is well known that Mojang has added 16 optional colors to many items and blocks. This data pack also provides similar functions.
Dye: Global Event List ID: dye
Wash: Global event list ID: wash
(Model class root tag) For details, see: Model class formatproperties:dyeable: stores dyeing related configurationsid: The ID of the element to be dyedkey: An NBT path. When the model is dyed, the value is modified to the specified value.values: Value listdefault: When using the default color, the value pointed to in the key above will be modified to this value.- (a custom color) When the model is dyed into the specified color, the value pointed to in the key above will be modified to this value
playsound_on_dyeing:(optional) The sound played when the model is dyed. If not specified, the default sound will be played.playsound_on_washing:(optional) The sound played when the model is cleaned. If not specified, the default sound will be played.
The configuration data of this module is stored in storage skmws config.dyeable, and the color configuration can be modified to adapt to new colors.
dyeable:colors: Color configuration- (a project)
item: Check the handheld item, For details, see: Wiki:itempredicatekey: The key name of the colorcolor: A ternary list, the RGB color value of the color, used to display particle effects
playsound_on_dyeing: The default sound played when the model is dyedplaysound_on_washing: The default sound played when the model is being cleaned
The default values for this configuration are as follows: The default value is written in function/cfg/config.mcfunction
{
    colors:[
        {item:"red_dye",key:"red",color:[0.7, 0.19, 0.17]},
        {item:"blue_dye",key:"blue",color:[0.15, 0.19, 0.57]},
        {item:"cyan_dye",key:"cyan",color:[0.16, 0.46, 0.59]},
        {item:"gray_dye",key:"gray",color:[0.26, 0.26, 0.26]},
        {item:"lime_dye",key:"lime",color:[0.25, 0.8, 0.2]},
        {item:"pink_dye",key:"pink",color:[0.85, 0.51, 0.6]},
        {item:"black_dye",key:"black",color:[0.12, 0.11, 0.11]},
        {item:"brown_dye",key:"brown",color:[0.32, 0.19, 0.1]},
        {item:"green_dye",key:"green",color:[0.23, 0.32, 0.1]},
        {item:"white_dye",key:"white",color:[0.94, 0.94, 0.94]},
        {item:"orange_dye",key:"orange",color:[0.92, 0.53, 0.27]},
        {item:"purple_dye",key:"purple",color:[0.48, 0.18, 0.75]},
        {item:"yellow_dye",key:"yello",color:[0.87, 0.81, 0.16]},
        {item:"magenta_dye",key:"magenta",color:[0.76, 0.33, 0.8]},
        {item:"light_blue_dye",key:"light_blue",color:[0.4, 0.54, 0.83]},
        {item:"light_gray_dye",key:"light_gray",color:[0.67, 0.67, 0.67]}
    ],
    playsound_on_dyeing:"minecraft:item.brush.brushing.gravel",
    playsound_on_washing:"minecraft:item.bucket.empty"
}
When the global event list dye is executed, the player handheld item will first be checked. If this item is defined in storage skmws config.dyeable.colors, the corresponding color key name will be obtained.
key and particle color
color, then use this key name to query a value in the model's dynamic configuration properties.dyeable.values, use this value to overwrite the original value of the data pointed to by properties.dyeable.key, and finally generate particles of the specified color. If any of the above steps fails, the model color will not change
When the global event list wash is executed, the original value of the data pointed to by properties.dyeable.key is overwritten by the value of properties.dyeable.values.default in the model's dynamic configuration.
For detailed tutorials on this section, see Tutorial: Dyeing
Case tutorial
Routine: Simple decoration model
Let’s start with the simplest one. The main function of the simple decoration model is decoration, so there is no need for too complicated effects. What we need to implement are these.
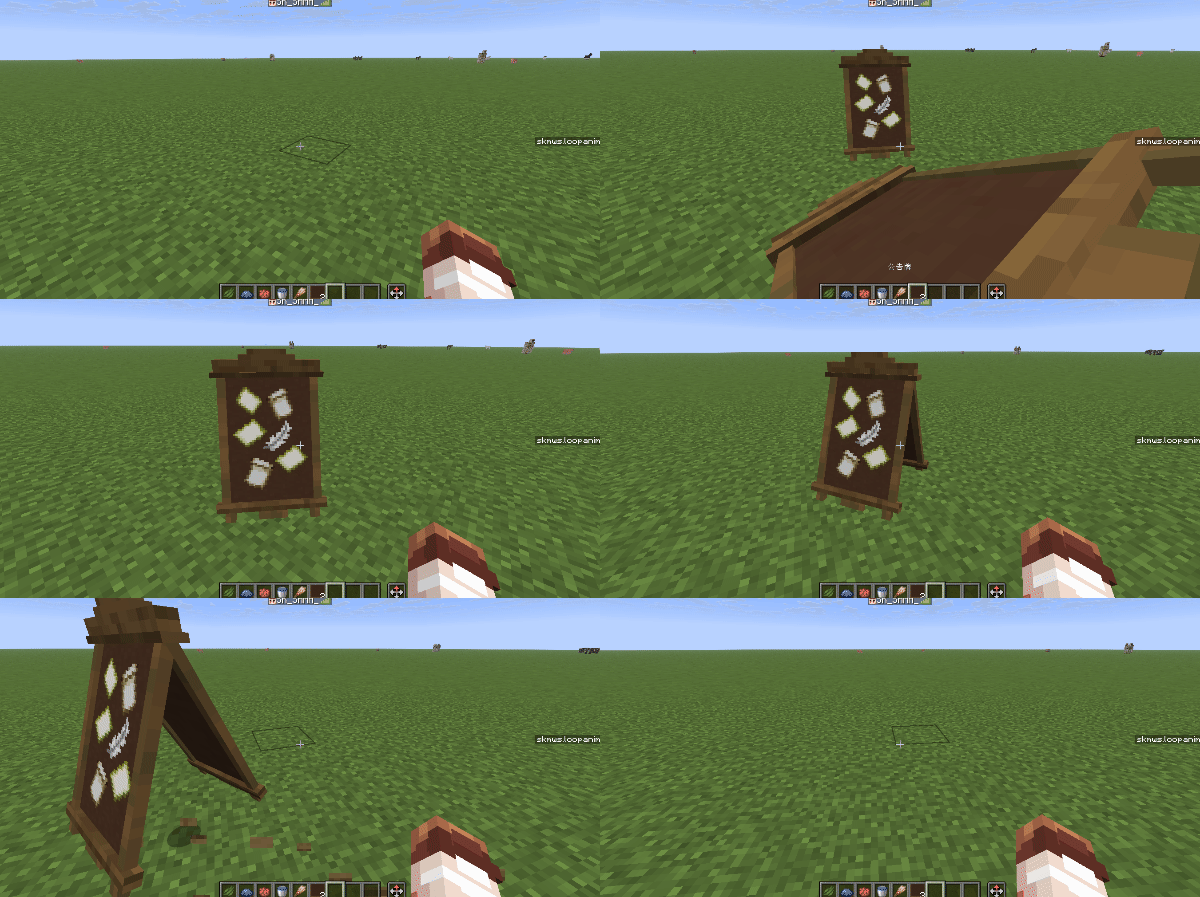
- Can be placed and destroyed like a block, and can drop items when destroyed.
- Correct direction and yaw angle during placement
- One-block collision box
The model class is defined as follows
{
    // 该模型类的元素
    elements:[

        // 物品展示实体,用于展示模型
        {
            type:"item_display",
            id:"display",
            merge:{

                // 使用custom_model_data组件来显示自定义模型
                item:{
                    id:"acacia_boat",
                    components:{
                        custom_model_data:{strings:["15230006"]}
                    }
                }

            },

            // 该元素的相对旋转角,这里y轴旋转180度是因为在制作模型的时候角度弄错了导致多转了180度,然后懒得改了,这里再转180度就可以转回原位
            rotation:[180,0]
        },

        // 交互实体,用于处理右键点击事件
        {
            type:"interaction",
            id:"interact",

            // 交互实体的宽高都比1稍大一些,这是为了防止玩家点到屏障
            merge:{
                width:1.01,
                height:1.01
            },

            criteria:{
                leftclick:[ // 一个条件列表,在左键模型时执行
                    { //一个检查项目,但是没有定义任何条件,所以该项目无论何时都是通过的
                      event:[{type:"destroy"}] //一个事件列表,功能是摧毁模型
                    }
                ]
            }
        }
    ],

    // 矫正模型位置,让模型对齐方块网格
    align_position:[1,1,1],

    // 矫正模型朝向,让模型对齐到8个基本方向
    align_rotation:45,

    // 模型的动态配置
    properties:{
      // 摧毁模型相关配置
      destroy:{

        // 摧毁时的声音和粒子
        playsound:"block.oak_wood.break",
        particle:"oak_planks",

        // 摧毁时的掉落物
        item:{
          // 掉落物的物品堆叠组件
          components:{

            // 自定义物品模型
            "minecraft:item_model":"acacia_boat",
            "custom_model_data":{strings:["15230006"]},

            // 自定义物品名字
            "minecraft:item_name":"公告牌"
          }
        }

      }
    }

    // 方块
    blocks:[
        // 在模型位置处放置一个屏障,用于充当一格的碰撞箱
        {block:"barrier",position:[0,0,0]}
    ]
}
Tutorial: Animation
Using the animation system of SK Model Workspace, you can complete some simple model animations
Now we need to make an iron golem digging machine and loop the digging animation
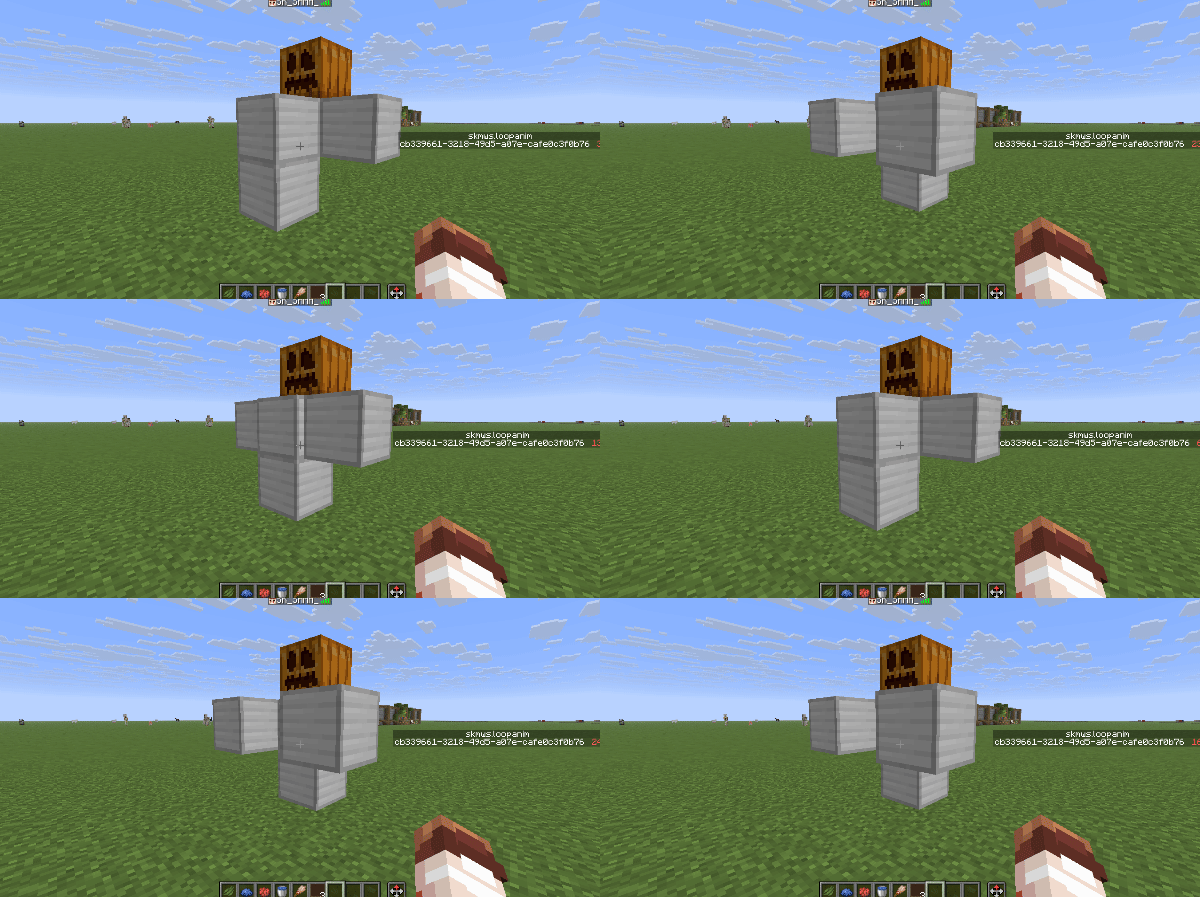
Observing the excavator, we found that the entire structure has a total of 5 blocks, so in the model class
In elements, elements need to be added to these five blocks respectively. The element IDs are head, body_1, body_2, body_3, body_4. An interactive entity is also needed to handle the right-click destruction operation.
elements:[
        {
            type:"item_display",
            id:"head",
            merge:{item:{id:"carved_pumpkin"}},
            position:[0,2,0]
        },
        {
            type:"item_display",
            id:"body_1",
            merge:{item:{id:"iron_block"}},
            position:[1,1,0]
        },
        {
            type:"item_display",
            id:"body_2",
            merge:{item:{id:"iron_block"}},
            position:[0,1,0]
        },
        {
            type:"item_display",
            id:"body_3",
            merge:{item:{id:"iron_block"}},
            position:[-1,1,0]
        },
        {
            type:"item_display",
            id:"body_4",
            merge:{item:{id:"iron_block"}},
            position:[0,0,0]
        },
        {
            type:"interaction",
            id:"interact",
            merge:{
                width:1.5,
                height:3
            },
            criteria:{
                leftclick:[
                    {
                        event:[{type:"destroy"}]
                    }
                ]
            }
        },
    ]
exist
Configure the sound effect particles and dropped objects during destruction in properties. There are no components added to the dropped objects here, so they will be displayed as the default texture (chicken spawn egg)
properties:{
        destroy:{
            particle:"iron_block",
            playsound:"minecraft:block.iron.break",
            item:{}
        }
    }
Then we need to make an iron golem digging animation and play it in a loop. How to do this? First, you need to define the animation as a private animation. The private animation is stored in the model class.
anim section
anim:{

        // 动画ID,这里定义了一个名为"main"的动画
        main:[
            {
                merge:{
                    body_1:{transformation:{translation:[0,0,1]},interpolation_duration:3},
                    body_2:{transformation:{translation:[0,0,0]},interpolation_duration:3},
                    body_3:{transformation:{translation:[0,0,1]},interpolation_duration:3},
                    body_4:{transformation:{translation:[0,0,0]},interpolation_duration:3}
                }
            },
            {
                merge:{
                    body_1:{transformation:{translation:[0,0,0]},interpolation_duration:3},
                    body_2:{transformation:{translation:[0,0,1]},interpolation_duration:3},
                    body_3:{transformation:{translation:[0,0,0]},interpolation_duration:3},
                    body_4:{transformation:{translation:[0,0,1]},interpolation_duration:3}
                },
                delay:14
            }
        ]
    }
Finally, we only need to let the animation automatically loop and play. We can automatically perform the animation playback operation through the on_load private event list.
events:{
        on_load:[{type:"anim",with:{anim:"main",loop:1b,time:28}}]
    }
Complete code [expand..]
{
    elements:[
        {
            type:"item_display",
            id:"head",
            merge:{item:{id:"carved_pumpkin"}},
            position:[0,2,0]
        },
        {
            type:"item_display",
            id:"body_1",
            merge:{item:{id:"iron_block"}},
            position:[1,1,0]
        },
        {
            type:"item_display",
            id:"body_2",
            merge:{item:{id:"iron_block"}},
            position:[0,1,0]
        },
        {
            type:"item_display",
            id:"body_3",
            merge:{item:{id:"iron_block"}},
            position:[-1,1,0]
        },
        {
            type:"item_display",
            id:"body_4",
            merge:{item:{id:"iron_block"}},
            position:[0,0,0]
        },
        {
            type:"interaction",
            id:"interact",
            merge:{
                width:1.5,
                height:3
            },
            criteria:{
                leftclick:[
                    {
                        event:[{type:"destroy"}]
                    }
                ]
            }
        },
    ],
    properties:{
        destroy:{
            particle:"iron_block",
            playsound:"minecraft:block.iron.break",
            item:{}
        }
    },
    anim:{
        main:[
            {
                merge:{
                    body_1:{transformation:{translation:[0,0,1]},interpolation_duration:3},
                    body_2:{transformation:{translation:[0,0,0]},interpolation_duration:3},
                    body_3:{transformation:{translation:[0,0,1]},interpolation_duration:3},
                    body_4:{transformation:{translation:[0,0,0]},interpolation_duration:3}
                }
            },
            {
                merge:{
                    body_1:{transformation:{translation:[0,0,0]},interpolation_duration:3},
                    body_2:{transformation:{translation:[0,0,1]},interpolation_duration:3},
                    body_3:{transformation:{translation:[0,0,0]},interpolation_duration:3},
                    body_4:{transformation:{translation:[0,0,1]},interpolation_duration:3}
                },
                delay:14
            }
        ]
    },
    events:{
        on_load:[{type:"anim",with:{anim:"main",loop:1b,time:28}}]
    },
    align_position:[1,1,1],
    align_rotation:90
}
Tutorial: Pushing a Model
Let’s look at an example. Now we need to make a TNT that can be pushed by the player.
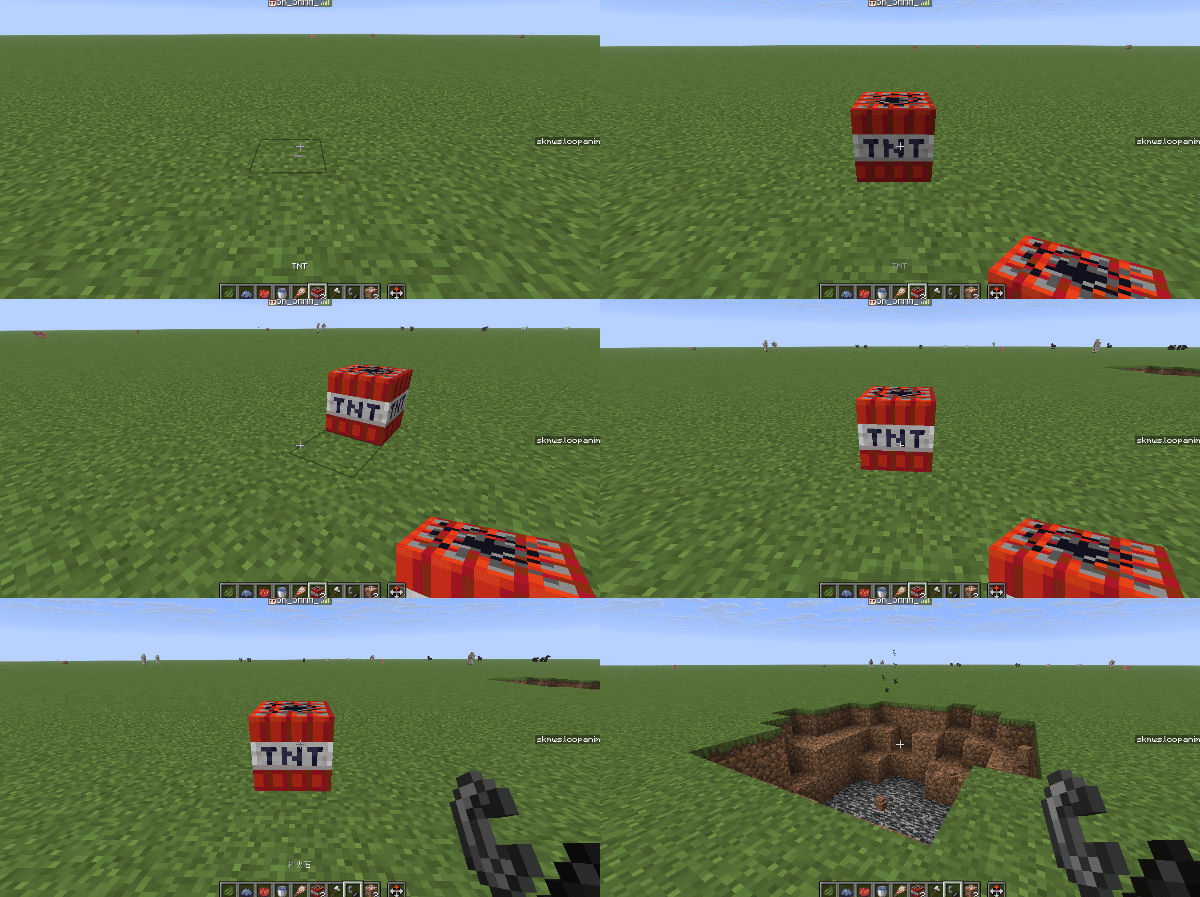
- Hold the iron ax and left click to destroy it
- Right click with empty hand to push
- Holding a flint and steel right-clicking can ignite it
- One-block collision box
Through observation, it is not difficult to find that this model requires a display entity and an interactive entity. The element list is as follows
elements:[
        {
            type:"item_display",
            id:"tnt",
            merge:{
                item:{id:"tnt"}
            }
        },
        {
            type:"interaction",
            id:"interact",
            merge:{
                width:1.01,
                height:1.01
            }
        }
    ]
Use barrier block to simulate collision box, written as follows
blocks:[
        {position:[0,0,0],block:"barrier"}
    ],
Now we need to process the player's operation, which can be processed through the Condition List→Event List architecture
criteria:{
                // 左键时执行的条件列表
                leftclick:[

                    // 手持铁斧时破坏模型
                    {
                        mainhand_item:"minecraft:iron_axe",
                        event:[{type:"destroy"}]
                    }
                ],

                // 右键时执行的条件列表
                rightclick:[

                    // 手持打火石时,移除模型,并在相同位置生成一个点燃的TNT
                    {
                        mainhand_item:"minecraft:flint_and_steel",
                        event:[
                            {type:"remove"},
                            {type:"cmd",with:{cmd:"summon minecraft:tnt ~ ~ ~ {fuse:20}"}}
                        ]
                    },

                    // 没有手持打火石时,右键即可推动模型
                    {
                        event:[{type:"call",with:{event:"push",global:1b}}]
                    }
                ]
            }
Finally, you only need to modify the dynamic configuration of the model
    properties:{
        pushable:{
            // 推动时发出的声音
            playsound:"minecraft:block.grass.hit"
        },
        destroy:{

            // 破坏粒子和音效
            particle:"tnt",
            playsound:"minecraft:block.grass.break",

            // 掉落物
            item:{
                components:{
                    "minecraft:item_model":"minecraft:tnt",
                    "minecraft:item_name":"TNT"
                }
            }
        },

        // 模型被创建时播放的声音
        playsound_on_place:"minecraft:block.grass.place"
    }
Complete code [expand..]
{
    elements:[
        {
            type:"item_display",
            id:"tnt",
            merge:{
                item:{id:"tnt"},
                teleport_duration:5
            }
        },
        {
            type:"interaction",
            id:"interact",
            merge:{
                width:1.01,
                height:1.01
            },
            criteria:{
                leftclick:[
                    {
                        mainhand_item:"minecraft:iron_axe",
                        event:[{type:"destroy"}]
                    }
                ],
                rightclick:[
                    {
                        mainhand_item:"minecraft:flint_and_steel",
                        event:[
                            {type:"remove"},
                            {type:"cmd",with:{cmd:"summon minecraft:tnt ~ ~ ~ {fuse:20}"}}
                        ]
                    },
                    {
                        event:[{type:"call",with:{event:"push",global:1b}}]
                    }
                ]
            }
        }
    ],
    align_position:[1,1,1],
    align_rotation:90,
    blocks:[
        {position:[0,0,0],block:"barrier"}
    ],
    properties:{
        pushable:{
            playsound:"minecraft:block.grass.hit"
        },
        destroy:{
            particle:"tnt",
            playsound:"minecraft:block.grass.break",
            item:{
                components:{
                    "minecraft:item_model":"minecraft:tnt",
                    "minecraft:item_name":"TNT"
                }
            }
        },
        playsound_on_place:"minecraft:block.grass.place"
    }
}
Tutorial: Dyeing
Dyeing is a very commonly used function. Next, we will take you through a simple example to understand this function.
Now we need to make a wool block that can be dyed
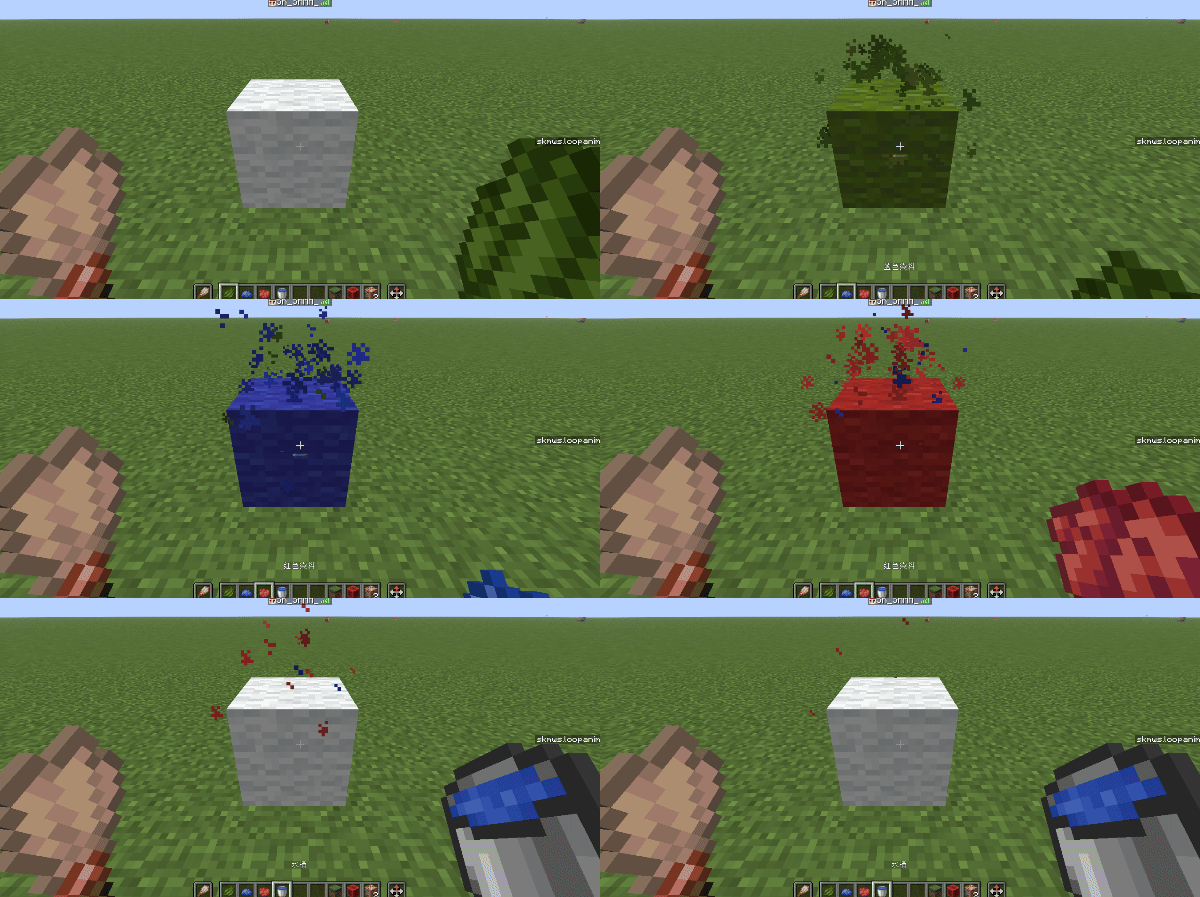
- When you hold a brush in your second hand and a dye in your main hand, you can right-click the wool block to dye the wool into the corresponding color.
- When you hold a brush in your secondary hand and a bucket in your main hand, right-click on the wool block to rinse the wool block back to white.
- Left click to destroy block
It is not difficult to find that this model contains two elements, a display entity and an interactive entity.
elements:[
    // 交互实体
        {
            type:"interaction",
            id:"interact",
            merge:{
                width:1.01,
                height:1.01
            },
            criteria:{
                //...
            }
        },

        // 展示实体
        {
            type:"item_display",
            // 记住这个id,一会要考
            id:"block",
            merge:{
                item:{
                    id:"white_wool"
                },
                teleport_duration:5
            }
        }
    ]
Then configure the condition list and event list
criteria:{
        // 左键摧毁方块
        leftclick:[
            {
                event:[{type:"destroy"}]
            }
        ],
        // 右键时
        rightclick:[
            // 副手持有刷子,主手持有染料时,右键羊毛方块,可以将羊毛染成对应颜色
            {
                offhand_item:"minecraft:brush",
                // #skmws:dye 标签中包含了所有染料
                mainhand_item:"#skmws:dyes",
                event:[{type:"call",with:{event:"dye",global:1b}}]
            },
            // 副手持有刷子,主手持有水桶时,右键羊毛方块,可以冲洗羊毛方块
            {
                offhand_item:"minecraft:brush",
                mainhand_item:"minecraft:water_bucket",
                event:[{type:"call",with:{event:"wash",global:1b}}]
            }
        ]
    }
Finally, the dynamic configuration of the model class
properties:{
        destroy:{
            particle:"white_wool",
            playsound:"minecraft:block.wool.break"
        },
        playsound_on_place:"minecraft:block.wool.place",

        // 染色与清洗相关的配置
        dyeable:{
            // 这里的元素id填写展示实体的元素id,表示要对该元素进行操作
            id:"block",
            // 这个NBT路径表示要修改指定元素的哪个值
            key:"item.id",
            // 值表,根据颜色决定要将key中路径的值替换为何值
            values:{
                default:"white_wool",
                red:"red_wool",
                blue:"blue_wool",
                green:"green_wool"
                //...
            }
        }
    }
Complete code [expand..]
{
    elements:[
        {
            type:"interaction",
            id:"interact",
            merge:{
                width:1.01,
                height:1.01
            },
            criteria:{
                leftclick:[
                    {
                        event:[{type:"destroy"}]
                    }
                ],
                rightclick:[
                    {
                        offhand_item:"minecraft:brush",
                        mainhand_item:"#skmws:dyes",
                        event:[{type:"call",with:{event:"dye",global:1b}}]
                    },
                    {
                        offhand_item:"minecraft:brush",
                        mainhand_item:"minecraft:water_bucket",
                        event:[{type:"call",with:{event:"wash",global:1b}}]
                    }
                ]
            }
        },
        {
            type:"item_display",
            id:"block",
            merge:{
                item:{
                    id:"white_wool"
                },
                teleport_duration:5
            }
        }
    ],
    blocks:[
        {position:[0,0,0],block:"barrier"}
    ],
    properties:{
        destroy:{
            particle:"white_wool",
            playsound:"minecraft:block.wool.break"
        },
        playsound_on_place:"minecraft:block.wool.place",
        dyeable:{
            id:"block",
            key:"item.id",
            values:{
                default:"white_wool",
                red:"red_wool",
                blue:"blue_wool",
                green:"green_wool"
            }
        }
    },
    align_position:[1,1,1],
    align_rotation:90
}
Practice: A silkier door
The door of vanillaMC does not have door opening and closing animation. Now let’s make a door with door opening and closing animation.
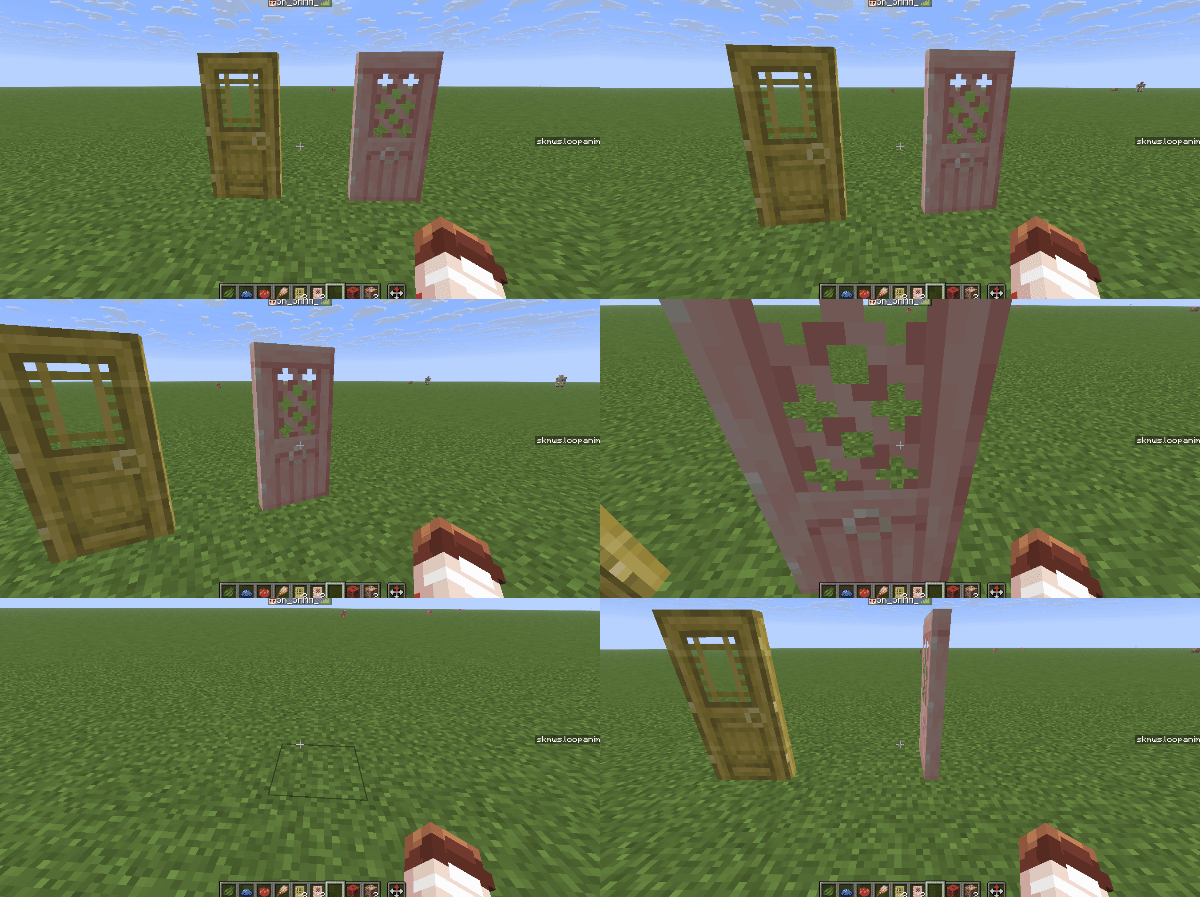
Let’s first think about how to implement this First of all, the display part of the door can be implemented with two block display entities. The interaction uses the interactive entity, and the collision box uses two barrier blocks.
{
    elements:[
        // 交互实体
        {
            type:"interaction",
            id:"interact",
            merge:{
                width:1.01,
                height:2
            }
        },
        // 方块展示实体,下半部分
        {
            type:"block_display",
            id:"lower",
            merge:{
                block_state:{
                    Name:"cherry_door",
                    Properties:{facing:"south",half:"lower"}
                }
            },
            position:[-0.5,0,-0.5]
        },
        // 方块展示实体,上半部分
        {
            type:"block_display",
            id:"upper",
            merge:{
                block_state:{
                    Name:"cherry_door",
                    Properties:{facing:"south",half:"upper"}
                }
            },
            position:[-0.5,1,-0.5]
        }
    ],
    // 方块,两个屏障
    blocks:[
        {position:[0,0,0],block:"barrier"},
        {position:[0,1,0],block:"barrier"}
    ]
}
However, this door cannot be interacted with at this time. In order to facilitate subsequent testing, we first implement left-click destruction and add destruction-related configurations to the dynamic configuration of the model.
criteria:{
                leftclick:[
                    {
                        event:[{type:"destroy"}]
                    }
                ]
}properties:{
destroy:{
// 破坏时的声音和粒子
playsound:"block.cherry_wood.break",
particle:"cherry_planks",
// 掉落物
item:{
components:{
"minecraft:item_model":"minecraft:cherry_door",
"minecraft:item_name":"补帧 · 樱花木门"
}
}
}
}Now we need to implement the operation of opening and closing the door with the right button. We might as well abstract this operation. Opening the door and closing the door can be regarded as two states. When you right-click, you can switch from one state to another. Using global event: toggle_state can easily solve the problem of state switching.
The condition list is written like this:
criteria:{
                rightclick:[
                    {
                        event:[{type:"call",with:{event:"toggle_state",global:1b}}]
                    }
                ]
            }
Then you need to add some dynamic configuration
 properties:{
        toggle_state:{
            // 当前状态,我们可以规定1为关门,0为开门,创建模型时默认关门,所以这里写1
            current_state:1,

            // 状态的总数量,门只有开门和关门两种状态,所以这里写2
            number_of_state:2
        }
Edit the events that need to be executed when switching to this state
- When closing the door: place a barrier, play the closing sound effect, and close the closing animation
- When opening the door: remove the barrier, play the opening sound effect, and open the door animation
events:{
        // 开门时执行的事件
        on_state_0:[

            // 播放开门音效
            {type:"playsound",key:"_door.playsound_open"},

            // 移除屏障
            {type:"block_remove",position:[0,0,0]},
            {type:"block_remove",position:[0,1,0]},

            // 动画(简单的动画可以直接使用merge实现)
            {
                type:"merge",
                id:"upper",
                data:{
                transformation:{
                    left_rotation:{axis:[0,1,0],angle:-1.5708},
                    translation:[0.1875,0,0]},
                    start_interpolation:0,
                    interpolation_duration:5
                }
            },
            {
                type:"merge",
                id:"lower",
                data:{
                    transformation:{
                        left_rotation:{axis:[0,1,0],angle:-1.5708},
                        translation:[0.1875,0,0]
                    },
                    start_interpolation:0,
                    interpolation_duration:5
                }
            }
        ],

        // 关门时执行的事件
        on_state_1:[

            // 播放关门音效
            {type:"playsound",key:"_door.playsound_close"},

            // 放置屏障
            {type:"block_append",position:[0,0,0],block:"barrier"},
            {type:"block_append",position:[0,1,0],block:"barrier"},

            // 动画
            {
                type:"merge",
                id:"upper",
                data:{
                    transformation:{
                        left_rotation:{axis:[0,1,0],angle:0},
                        translation:[0,0,0]
                    },
                    start_interpolation:0,
                    interpolation_duration:5
                }
            },
            {
                type:"merge",
                id:"lower",
                data:{
                    transformation:{
                        left_rotation:{axis:[0,1,0],angle:0},
                        translation:[0,0,0]
                    },
                    start_interpolation:0,
                    interpolation_duration:5
                }
            }
        ]
    }
The sound effects used in the event need to be defined in the dynamic configuration
properties:{
        _door:{
            playsound_open:"block.cherry_wood_door.open",
            playsound_close:"block.cherry_wood_door.close"
        }
    }
At this point you have completed the definition of this model class
Complete code [expand..]
{
    abstract: 1b,
    elements:[
        {
            type:"interaction",
            id:"interact",
            merge:{
                width:1.01,
                height:2
            },
            criteria:{
                leftclick:[
                    {
                        event:[{type:"destroy"}]
                    }
                ],
                rightclick:[
                    {
                        event:[{type:"call",with:{event:"toggle_state",global:1b}}]
                    }
                ]
            }
        },
        {
            type:"block_display",
            id:"lower",
            merge:{
                block_state:{
                    Name:"cherry_door",
                    Properties:{
                        facing:"south",
                        half:"lower"
                    }
                }
            },
            position:[-0.5,0,-0.5]
        },
        {
            type:"block_display",
            id:"upper",
            merge:{
                block_state:{
                    Name:"cherry_door",
                    Properties:{
                        facing:"south",
                        half:"upper"
                    }
                }
            },
            position:[-0.5,1,-0.5]
        }
    ],
    blocks:[
        {position:[0,0,0],block:"barrier"},
        {position:[0,1,0],block:"barrier"}
    ],
    events:{
        on_state_0:[
            {type:"playsound",key:"_door.playsound_open"},
            {type:"block_remove",position:[0,0,0]},
            {type:"block_remove",position:[0,1,0]},
            {
                type:"merge",
                id:"upper",
                data:{
                transformation:{
                    left_rotation:{axis:[0,1,0],angle:-1.5708},
                    translation:[0.1875,0,0]},
                    start_interpolation:0,
                    interpolation_duration:5
                }
            },
            {
                type:"merge",
                id:"lower",
                data:{
                    transformation:{
                        left_rotation:{axis:[0,1,0],angle:-1.5708},
                        translation:[0.1875,0,0]
                    },
                    start_interpolation:0,
                    interpolation_duration:5
                }
            }
        ],
        on_state_1:[
            {type:"playsound",key:"_door.playsound_close"},
            {type:"block_append",position:[0,0,0],block:"barrier"},
            {type:"block_append",position:[0,1,0],block:"barrier"},
            {
                type:"merge",
                id:"upper",
                data:{
                    transformation:{
                        left_rotation:{axis:[0,1,0],angle:0},
                        translation:[0,0,0]
                    },
                    start_interpolation:0,
                    interpolation_duration:5
                }
            },
            {
                type:"merge",
                id:"lower",
                data:{
                    transformation:{
                        left_rotation:{axis:[0,1,0],angle:0},
                        translation:[0,0,0]
                    },
                    start_interpolation:0,
                    interpolation_duration:5
                }
            }
        ]
    },
    properties:{
        destroy:{
            playsound:"block.cherry_wood.break",
            particle:"cherry_planks",
            item:{
                components:{
                    "minecraft:item_model":"minecraft:cherry_door",
                    "minecraft:item_name":"补帧 · 樱花木门"
                }
            }
        },
        _door:{
            playsound_open:"block.cherry_wood_door.open",
            playsound_close:"block.cherry_wood_door.close"
        },
        playsound_on_place:"block.cherry_wood.place",
        toggle_state:{
            current_state:1,
            number_of_state:2
        }
    },
    align_position:[1,1,1],
    align_rotation:90
}
But don’t worry, I just made a model class of cherry blossom wooden door, now I need to expand it. First, extract the data common to all doors and put it in the parent class (the non-shared data below has been annotated), and define the parent class as an abstract class
// 类名: _door
{
    // 定义为抽象类
    abstract: 1b,
    elements:[
        {
            type:"interaction",
            id:"interact",
            merge:{
                width:1.01,
                height:2
            },
            criteria:{
                leftclick:[
                    {
                        event:[{type:"destroy"}]
                    }
                ],
                rightclick:[
                    {
                        event:[{type:"call",with:{event:"toggle_state",global:1b}}]
                    }
                ]
            }
        },
        {
            type:"block_display",
            id:"lower",
            merge:{
                block_state:{
                    // Name:"cherry_door",
                    Properties:{
                        facing:"south",
                        half:"lower"
                    }
                }
            },
            position:[-0.5,0,-0.5]
        },
        {
            type:"block_display",
            id:"upper",
            merge:{
                block_state:{
                    // Name:"cherry_door",
                    Properties:{
                        facing:"south",
                        half:"upper"
                    }
                }
            },
            position:[-0.5,1,-0.5]
        }
    ],
    blocks:[
        {position:[0,0,0],block:"barrier"},
        {position:[0,1,0],block:"barrier"}
    ],
    events:{
        on_state_0:[
            {type:"playsound",key:"_door.playsound_open"},
            {type:"block_remove",position:[0,0,0]},
            {type:"block_remove",position:[0,1,0]},
            {
                type:"merge",
                id:"upper",
                data:{
                transformation:{
                    left_rotation:{axis:[0,1,0],angle:-1.5708},
                    translation:[0.1875,0,0]},
                    start_interpolation:0,
                    interpolation_duration:5
                }
            },
            {
                type:"merge",
                id:"lower",
                data:{
                    transformation:{
                        left_rotation:{axis:[0,1,0],angle:-1.5708},
                        translation:[0.1875,0,0]
                    },
                    start_interpolation:0,
                    interpolation_duration:5
                }
            }
        ],
        on_state_1:[
            {type:"playsound",key:"_door.playsound_close"},
            {type:"block_append",position:[0,0,0],block:"barrier"},
            {type:"block_append",position:[0,1,0],block:"barrier"},
            {
                type:"merge",
                id:"upper",
                data:{
                    transformation:{
                        left_rotation:{axis:[0,1,0],angle:0},
                        translation:[0,0,0]
                    },
                    start_interpolation:0,
                    interpolation_duration:5
                }
            },
            {
                type:"merge",
                id:"lower",
                data:{
                    transformation:{
                        left_rotation:{axis:[0,1,0],angle:0},
                        translation:[0,0,0]
                    },
                    start_interpolation:0,
                    interpolation_duration:5
                }
            }
        ]
    },
    properties:{
        destroy:{
            // playsound:"block.cherry_wood.break",
            // particle:"cherry_planks",
            // item:{
            //    components:{
            //        "minecraft:item_model":"minecraft:cherry_door",
            //        "minecraft:item_name":"补帧 · 樱花木门"
            //    }
            // }
        },
        _door:{
            // playsound_open:"block.cherry_wood_door.open",
            // playsound_close:"block.cherry_wood_door.close"
        },
        // playsound_on_place:"block.cherry_wood.place",
        toggle_state:{
            current_state:1,
            number_of_state:2
        }
    },
    align_position:[1,1,1],
    align_rotation:90
}
Then let the subclass inherit from the parent class and add the private data of the subclass. The following demonstrates the definition of cherry wood door class and bamboo wood door class.
// 类名:cherry_door
{
    extends:"_door",
    elements:[
        {id:"upper",merge:{block_state:{Name:"cherry_door"}}},
        {id:"lower",merge:{block_state:{Name:"cherry_door"}}}
    ],
    properties:{
        destroy:{
            playsound:"block.cherry_wood.break",
            particle:"cherry_planks",
            item:{
                components:{
                    "minecraft:item_model":"minecraft:cherry_door",
                    "minecraft:item_name":"补帧 · 樱花木门"
                }
            }
        },
        _door:{
            playsound_open:"block.cherry_wood_door.open",
            playsound_close:"block.cherry_wood_door.close"
        },
        playsound_on_place:"block.cherry_wood.place"
    }
}// 类名:bamboo_door
{
extends:"_door",
elements:[
{id:"upper",merge:{block_state:{Name:"bamboo_door"}}},
{id:"lower",merge:{block_state:{Name:"bamboo_door"}}}
],
properties:{
destroy:{
playsound:"block.bamboo_wood.break",
particle:"bamboo_planks",
item:{
components:{
"minecraft:item_model":"minecraft:bamboo_door",
"minecraft:item_name":"补帧 · 竹木门"
}
}
},
_door:{
playsound_open:"block.bamboo_wood_door.open",
playsound_close:"block.bamboo_wood_door.close"
},
playsound_on_place:"block.bamboo_wood.place"
}
}It can be seen that inheritance reduces redundant code and greatly improves code reusability.
Door (_door) complete code [expand..]
{
    abstract: 1b,
    elements:[
        {
            type:"interaction",
            id:"interact",
            merge:{
                width:1.01,
                height:2
            },
            criteria:{
                leftclick:[
                    {
                        event:[{type:"destroy"}]
                    }
                ],
                rightclick:[
                    {
                        event:[{type:"call",with:{event:"toggle_state",global:1b}}]
                    }
                ]
            }
        },
        {
            type:"block_display",
            id:"lower",
            merge:{
                block_state:{
                    Properties:{
                        facing:"south",
                        half:"lower"
                    }
                }
            },
            position:[-0.5,0,-0.5]
        },
        {
            type:"block_display",
            id:"upper",
            merge:{
                block_state:{
                    Properties:{
                        facing:"south",
                        half:"upper"
                    }
                }
            },
            position:[-0.5,1,-0.5]
        }
    ],
    blocks:[
        {position:[0,0,0],block:"barrier"},
        {position:[0,1,0],block:"barrier"}
    ],
    events:{
        on_state_0:[
            {type:"playsound",key:"_door.playsound_open"},
            {type:"block_remove",position:[0,0,0]},
            {type:"block_remove",position:[0,1,0]},
            {
                type:"merge",
                id:"upper",
                data:{
                transformation:{
                    left_rotation:{axis:[0,1,0],angle:-1.5708},
                    translation:[0.1875,0,0]},
                    start_interpolation:0,
                    interpolation_duration:5
                }
            },
            {
                type:"merge",
                id:"lower",
                data:{
                    transformation:{
                        left_rotation:{axis:[0,1,0],angle:-1.5708},
                        translation:[0.1875,0,0]
                    },
                    start_interpolation:0,
                    interpolation_duration:5
                }
            }
        ],
        on_state_1:[
            {type:"playsound",key:"_door.playsound_close"},
            {type:"block_append",position:[0,0,0],block:"barrier"},
            {type:"block_append",position:[0,1,0],block:"barrier"},
            {
                type:"merge",
                id:"upper",
                data:{
                    transformation:{
                        left_rotation:{axis:[0,1,0],angle:0},
                        translation:[0,0,0]
                    },
                    start_interpolation:0,
                    interpolation_duration:5
                }
            },
            {
                type:"merge",
                id:"lower",
                data:{
                    transformation:{
                        left_rotation:{axis:[0,1,0],angle:0},
                        translation:[0,0,0]
                    },
                    start_interpolation:0,
                    interpolation_duration:5
                }
            }
        ]
    },
    properties:{
        toggle_state:{
            current_state:1,
            number_of_state:2
        }
    },
    align_position:[1,1,1],
    align_rotation:90
}
Sakura wood door type (cherry_door) complete code [expand..]
{
    extends:"_door",
    elements:[
        {id:"upper",merge:{block_state:{Name:"cherry_door"}}},
        {id:"lower",merge:{block_state:{Name:"cherry_door"}}}
    ],
    properties:{
        destroy:{
            playsound:"block.cherry_wood.break",
            particle:"cherry_planks",
            item:{
                components:{
                    "minecraft:item_model":"minecraft:cherry_door",
                    "minecraft:item_name":"补帧 · 樱花木门"
                }
            }
        },
        _door:{
            playsound_open:"block.cherry_wood_door.open",
            playsound_close:"block.cherry_wood_door.close"
        },
        playsound_on_place:"block.cherry_wood.place"
    }
}
Bamboo_door complete code [expand..]
{
    extends:"_door",
    elements:[
        {id:"upper",merge:{block_state:{Name:"bamboo_door"}}},
        {id:"lower",merge:{block_state:{Name:"bamboo_door"}}}
    ],
    properties:{
        destroy:{
            playsound:"block.bamboo_wood.break",
            particle:"bamboo_planks",
            item:{
                components:{
                    "minecraft:item_model":"minecraft:bamboo_door",
                    "minecraft:item_name":"补帧 · 竹木门"
                }
            }
        },
        _door:{
            playsound_open:"block.bamboo_wood_door.open",
            playsound_close:"block.bamboo_wood_door.close"
        },
        playsound_on_place:"block.bamboo_wood.place"
    }
}